Search This Blog

Pages

Tuesday, May 25, 2010

Peanut Butter and Chocolate Bars


It seems to be a food blogger tradition.  If you go and read any food blog, you will most likely see a recipe for one of these or something similar.  I love the taste of peanut butter and chocolate combination, but I don't normally have peanut butter at home.  I just saw too many delicious photos of peanut butter bars in many food blogs recently and then I decided to make these.  After going through few recipes I came up with below.  I used the McVitie's Digestives, because they just taste great and I wanted the peanut butter to be a little bit crunchy.  Next time I may try to use some cornflakes or another kind of breakfast cereal instead.  They were very delicious and very rich.  Kids loved it but they are dangerous for adults as we can easily get addicted to them.  It is very easy to make these and you don't need to bake anything, which is great.  The peanut butter layer was softer than the chocolate layer so I recommend to take it out from the fridge 15 minutes earlier before you serve.  It will be also easier to slice.

(Makes about 16 bars)

Peanut Butter Layer:

1 cup dark brown sugar
75 g (about 5 tablespoons) butter- melted
350 g (1.5 cup) of creamy peanut butter
1 pack of McVities Digestives biscuits (250 g pack) - crumbled

Chocolate Layer:
300 g (2 cups) of dark chocolate broken into smaller bits (70% cocoa solids) or chocolate chips
1 teaspoon of vanilla sugar
1 tablespoon of butter

You will need a rectangular or square shaped brownie or baking tin for this.  Start with preparing the peanut butter layer.  First whisk the sugar and butter together to form a creamy mixture.  Stir in the peanut butter and then the biscuits.  Spread the mixture to the bottom of the baking tin and try to make it an even layer as much as possible.  Next, melt the chocolate in a bowl, that is sitting on a saucepan of simmering water.  Add in the butter and vanilla sugar and stir until the mixture is smooth.  Last step is to spread the chocolate mixture on top of the peanut butter layer.  Put the tin in the fridge until the chocolate is set.
I made this the night before and it was perfect the next day.  Don't forget to take it out of the fridge about 15 minutes before you serve.  Slice it with a sharp knife and enjoy your peanut butter bars.  

Thursday, May 20, 2010

Aussie Pie with Puff Pastry


Here is another recipe I really had to write about.  I've learned this from my mother-in-law, who learned from their Australian family friends and I've been making this very tasty pie since then.  It's another simple dish that you will keep making if you try it once.  It is something like pasta or pizza.  If you have the pastry at home, it's a wonderful and a filling meal for everyone.  My children absolutely love this and it is also an easy recipe if you are having guests around.  This version of the Aussie pie is made with ready fresh puff pastry, which makes the preparation very easy and quick.  You need some ground beef and some vegetables that you think that might go well with the beef.  I used below vegetables this time, but it's also great with zucchini, peas, sweet corn, etc.  I would definitely recommend to put one chopped tomato in it always to make the filling a little bit juicy.  Alternatively you can use vegetable or meat stock or 1-2 tablespoons of cream.  Please write your comments if you try this recipe.  I am really interested in to hear what versions you have been making.


2 round fresh puff pastry (33cm - app. 13'')
1 egg beaten 

Filling:
500 g ground beef
1 onion - chopped
1 red pepper - chopped
1 aubergine - diced
1/2 leek - chopped
300 g mushrooms - chopped
1 tomato - chopped
1/2 teaspoon of ground cummin
1/2 teaspoon of mild or hot chili powder
salt and pepper to taste

Preheat your oven to 180° C(356° F).  In a pan over medium heat start cooking your beef together with the onions.  When they are cooked a little bit, add in the aubergines, peppers, leeks and saute them together with the meat and onions.  The vegetables shouldn't be overcooked.  3-4 minutes before you take it off the heat, add in all the spices, mushrooms and tomatoes.  When the filling is ready, taste to see if it needs more salt or spice.  Set is aside to cool down a little bit. 
Take a pie tin or a tart tin and put the first puff pastry at the bottom over a baking paper.  Make some holes on it by using a fork.  If your filling has cooled enough put the filling over the pastry and cover it with the second pastry on top.  Seal the sides by folding and cut the excess bits of the pastry if necessary.  Brush the top layer with the beaten egg and bake the pie in the preheated oven for 20-25 minutes until the pastry has a golden brown color on top.  Serve it with some fresh green salad or any other salad of your choice. 

Sunday, May 16, 2010

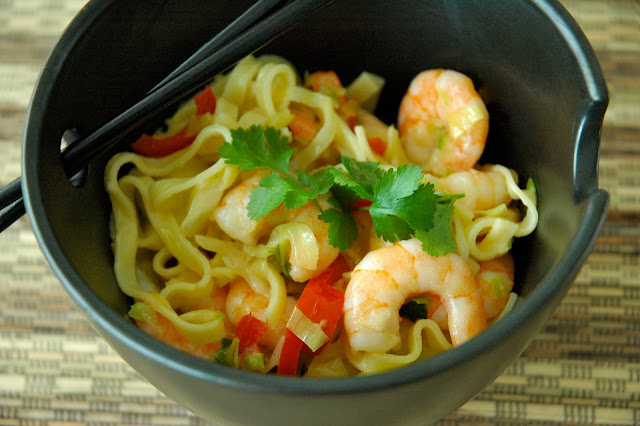
Noodles with Coconut Shrimps


I never used to like them and avoided them until about 8-9 years ago.  I have no idea why I never liked these tasty little things.  It could be that the first time I tried them, they weren't cooked so nice.   I  remember where I decided to have a go again.  It was in an Italian restaurant in Dusseldorf, where I was with my best friend J, who loved shrimps and would always order shrimps in any restaurant we go.  We had ordered some antipasti and they had really delicious, a little bit spicy shrimps with some olive oil.  After that meal I started to eat shrimps at every opportunity I get.   
I have tried these noodles in my favorite Thai restaurant and I have tried to make different versions since.  For this recipe I used frozen shrimps, and ready made fresh noodles.  The coconut milk and shrimp combination tastes lovely and you can also use some aromatic rice here instead of the noodles if you prefer.  If you want it more spicy, then add more chili in it as this is a milder version.

(Serves 3-4)

250 g fresh noodles ( I used fettuccine here)
300 g shrimps
1 leek chopped
1 spring onion chopped
1 medium red pepper
1/2 white cabbage
1/2 cup coconut milk
salt & pepper to taste
1/2 teaspoon hot chili powder or chopped fresh chili pepper
1 tablespoon of coconut oil or any other mild cooking oil
About a handful of coriander leaves to garnish


You need to prepare your vegetables before because this all goes really fast.  Start with cooking your noodles as usual like you cook your pasta.  In a wok, heat the coconut oil.  When it's hot enough, put your shrimps in the wok and stir-fry them for about 2-3 minutes, then take them out to a plate, but leave the cooking oil in the wok.  Add in the leeks and stir-fry them for a minute, then add in the rest of the vegetables, peppers, cabbage and onions.  When they are all cooked a little, add back in the shrimps, the chili or chili powder.  Add in the coconut milk with some salt and pepper.  The shrimps are cooked really fast so you need to just check if your vegetables are done enough for you.  Don't overcook the shrimps. When you are ready, stir the noodles in to everything else in the wok and leave them for a minute.  Serve the noodles with few fresh coriander leaves on top. 

Wednesday, May 12, 2010

Vegetable Samosa with Puff Pastry

Celeriac is really something I don't know how else to cook, other than the usual Turkish dishes I learned from my mother and as soup.  I really wanted to do something a little different this time and I thought to try it as a samosa, which is an Indian dish, very similar to the typical Turkish borek but has a spicy curry touch.  It's one of my favorite starters when I go to an Indian restaurant.  I absolutely love them.  I didn't want to make these too hot for the usual reason.  I wanted the kids to enjoy this little snack.  I generally make a dish with celeriac adding in potatoes, peas, carrots, onions and of course olive oil.  These little samosas have all of those except the carrots.  I preferred to use the puff pastry to give it a lighter taste.  They turned out really good.  In fact, I am going to make this one of my repetitive recipes and try it with other vegetables as well.  


(Makes 16)
1 rectangular puff pastry (42x26 cm) (16"x10")
1 small celeriac - chopped into little cubes
2 medium potatoes - chopped into little cubes
1 small onion - chopped
1 cup of frozen or fresh peas
1 teaspoon of curry powder
1/2 teaspoon of mild chili powder
1/2 teaspoon of cumin ground
1/2 tablespoon of fresh dill leaves
1 tablespoon of olive oil
1 egg- beaten
salt and pepper to taste


First of all, you need to saute the vegetables in a non-stick pan.  Heat the pan with the olive oil and put the onions first.  Saute them until they are cooked and then add in the celeriac, potatoes and the peas.  Add in the spices, with some salt and pepper.  Make sure the vegetables are cooked but they shouldn't be over-cooked, otherwise they will get mushy.  When they are done take them off the heat, add in the dill and set it aside to cool.  Preheat your oven to 180° C(356° F) degrees.  Lay the puff pastry on a baking tray over a baking sheet.  I used the big puff pastry and sliced it into 16 little squares as in the photo, but if you can find the little square shaped puff pastries then don't bother to buy the big one for this recipe.  Once you are ready, put about a spoonful of the vegetables on the pastry and fold it into a triangle shape.  Spread some egg onto the edges with a brush, so that the ends of the pastry can stick together.  I used a fork to press the ends together and folded the corners to give it a more samosa looking shape.  When it is all ready brush them over with the rest of the egg and put them in the oven for about 20 minutes until they are done.  These are best when they are eaten warm.  If you want to make a meal out of them, I recommend to serve them with a nice green salad. 

Friday, May 7, 2010

Vanilla and Cinnamon Waffles

I remember where I ate my first waffle ever.  It was in Istanbul, in Bebek.  I am not sure if the place still exists but they used to make the world's best chocolate and banana waffles.  At least for me it was the best.  My cousin introduced me to that place at the time and I'm so happy that she did, because I have never forgotten those delicious waffles and their lovely smell.  That was long long time ago, and I have eaten many waffles since, but I guess none of them were that good.  Few months ago I was in search for a toaster, which can also make waffles and I found what I was looking for.  I have made waffles only twice since I bought it.  This recipe came out in the second trial and they were very good, so I wanted to share.  If you have a waffle maker then try this recipe. The waffles turn out so good, you can even eat them without putting anything on them.  This recipe made about 10 waffles for me.


2 cups of flour
2 cups of milk
2 tablespoons of sugar
1/2 tablespoon of vanilla sugar
2 teaspoons of baking powder
1/2 teaspoon of cinnamon (use cinnamon that is freshly grounded, it still has to have some lovely cinnamon smell)
1/2 teaspoon of lemon zest
3/4 teaspoon of salt
2 tablespoon of butter (melted)
2 eggs

Start with whisking the eggs and the sugar in a bowl.  Add the milk, melted butter, lemon zest and vanilla sugar to this mixture.  In a separate bowl, mix the rest of the ingredients, flour, baking powder, cinnamon and salt.  Once the dry ingredients are mixed well enough, combine the two mixtures and whisk all together.  Use a ladle to put the mixture into your preheated waffle maker.  Try not to put too much, otherwise it will overflow.  Bake them until they have a nice golden brown color.  I put some maple syrup and banana slices on mine and sprinkled a little bit of icing sugar.  Next time I will be trying them with chocolate and bananas. 

Tuesday, May 4, 2010

Macaroni and Cheese with Spinach


I seem to always have a question in my mind when I'm thinking about what to cook. "Would my children eat this?" They are not picky children, but they are still very small.  I do try to introduce them to a variety of cuisines as much as possible, but it is not always easy to find suitable dishes, especially when one of them has only 10 teeth.  I try to make sure I cook something that is attractive for everybody.  I do the usual pasta dishes once a week or so, but I do get bored of cooking pasta the usual way sometimes and I need a change.  This time I decided to try the famous mac and cheese, but I wanted to add some vegetables in it to make a little bit more balanced meal for the children.  This is quite an easy recipe and kids love it.  You can always try with other kind of vegetables or cheese.  


300 g pasta (cornetti type)
about 300 g of cooked spinach (you can use fresh or frozen)
100 g Gorgonzola cheese - chopped into little pieces
50 g Mozzarella - chopped into little pieces
70 g grated Parmesan
250 ml milk (about a cup of milk)
2 eggs
salt and pepper
15 gr butter - chopped into little pieces
4-5 fresh basil leaves - roughly chopped


Start with cooking your pasta as usual by following the instructions on the package.  When it's cooked drain and leave it to cool for a while.  In a separate bowl, whisk two eggs, milk, some salt and pepper.  Take a gratin or baking dish and put your pasta, spinach, Gorgonzola, most of the Parmesan (leave about a tablespoon of it for later), basil and egg mixture in and mix them all together.  Next, put the Mozzarella pieces and sprinkle the rest of the Parmesan over, then put the bits of butter on top.  Bake it in a preheated oven at 180° C(356° F) for about 35-40 minutes.  I would check with a fork if it's done inside as well before taking it out.  It goes really well with a mixed salad.  Enjoy!