Search This Blog

Pages

Showing posts with label vegetarian. Show all posts

Thursday, May 5, 2011

Turkish Zucchini Fritters Baked Version (Kabak Mücver)


I know I should write more Turkish recipes.  There is nothing like Turkish cuisine because it's so rich, full of variety, flavor.  In the end, it was contributed by so many cultures from the Ottoman times.  I absolutely love it and this food was the only thing that I was craving during my pregnancies.  Then the kids came and ruined it all. Now I have to cook child friendly food. I'm not saying Turkish kitchen is not child friendly. It is actually the opposite. I always make the usual kofte and a lot of the vegetable dishes, but I can't make very spicy dishes. If I do then it has to be cooked separately and who has the time?  Like a lot of my friends have been asking for my mother's kisir recipe (a kind of couscous salad), which is full of onions and chili pepper but how can I tell them I haven't actually made it for over a year. I make less spicy versions but not the original.  I promise, I will post the recipe but not just yet.  It has to be done right.
Kabak mucver is a very typical Turkish dish.  However, the original version is deep fried in oil and I have made a baked version.  It came out a lot softer than the fried version but it tasted delicious.  You can try it like my version or be brave and fry it with a little bit of oil in the pan.


(Makes 4 portions)

4-5 Zucchinis - grated
6 tbsp flour (alternatively you can use bread crumbs)
2-3 spring onions - finely chopped
1 egg
1 cup of feta cheese - crumbled (alternatively you can use grated Parmesan cheese)
1 tbsp of chopped fresh dill
1 tbsp of chopped fresh parsley
1 tbsp of chopped fresh peppermint
2 tbsp of olive oil
Salt
Pepper
1 tsp of paprika

Drain your grated zucchini and mix it with all the other ingredients in a bowl.  Heat your oven to 180. 
Place a baking sheet on your oven tray.  Take scoops of the mixture and put them on the tray.  Flatten them a little bit like cookies.  When ready, bake them in the preheated oven for about 20-25 minutes. 
After they are done, leave them to cool for 5 minutes.  With the help of a spatula, carefully take them out of the tray to plates for serving.  
These fritters are great with plain yogurt or cacik.  Enjoy!

Tuesday, March 15, 2011

Rösti

It has been one year since I started writing this blog.  It has been really great to share some of my favorite recipes with all of you.  I have enjoyed writing the recipes and photographing the food with hungry kids waiting to be fed.  It has been a great experience.  But... Of course there is a but... It takes a lot of effort to write and publish each post.  Sure, it doesn't have to be that way.  It is not how I would like to go on about it.  Not perfect probably but as better as it gets and it will continue like that.
Happy anniversary to Olives and Bread.  To celebrate, here is a recipe from Switzerland.  I know I had to write this super simple recipe for some friends and relatives.  This reminds me that there are still some people out there waiting for a Turkish version of this blog.  I am just waiting for the days that I will have time for that, so stay tuned.
Back to lovely rösti.   I ate this first time with my friend F at Zurich main train station.  There used to be a restaurant there with rösti specials.  It's unfortunate that it's now closed but they had a good variety of rösti dishes.  With cheese, with onions, with bacon, etc. I have learned how to make this from my mother-in-law and she does it with coconut butter most of the time.  It's very delicious like that and I definitely recommend it.  Usually it's made with butter or oil. Use whichever you prefer.   Rösti goes really well with cheese or meat, or any creamy meat dish, like Zurich Geschnetzeltes (cut meat Zurich style - recipe will be coming up soon). 

(Makes 4 portions as a side dish)

700-800 g potatoes (preferably fast cooking ones if you make it from raw potatoes - see below for reason)
butter or oil to cook
salt and pepper to taste

There are two ways of doing this.  You can either boil the potatoes with their skin. Then peel and make the rösti or you can do it from raw potatoes.  Either way you have to peel the potatoes and grate them to start with.  Put some salt and freshly milled black pepper in the grated potatoes and mix well.
Take a large non-stick pan, preferable with a lid.  Put some oil in it and put it over medium-high heat.  When it's hot enough, add the grated potatoes in.  With the help of a spatula flatten the top so it looks like a big potato pancake.  Close the lid and leave it to cook for few minutes.  Check the bottom frequently to make sure it's not burnt.  If you are making it from raw potatoes, stir it once in a while so that it's cooked better and fried bits from the bottom are mixed in.  This way you can get it to be more crispy.  You can use the same method also if you are making it from cooked potatoes.  Just make sure you flatten the top eventually and leave the bottom last time to brown nicely.  Once the it is brown underneath, you need to turn it upside down to cook both sides equally.  I use the lid to do that so the form (potato pancake) stays the same.  Just make sure you don't burn your hands.  When it's brown on both sides then it's done. You can use round rings or large cookie cutters to cut out shapes or slice it like a cake to serve. 

Enjoy!

Tuesday, October 5, 2010

Cacik - Yogurt and Cucumber Meze

It has been too long but it's like this once you have a vacation.  You mentally check out from all the things you should be doing and if you are a mother then you start thinking what to pack.  Yes I was on holiday again and it was great.  But it is time to get back on the usual daily routine so as I promised I am writing the recipe for the famous "Cacik".  I guess it is a little strange for me to write this because I never heard of a Turkish person giving the recipe for this to another Turkish person.  It seems like we learn this from our mothers and pass it on to our children. It comes naturally, without being written anywhere.  It is also too easy to write.  However I had so many friends asking for the recipe so I had to write it.  The way cacik is done varies within different parts of the country, however the ingredients are generally the same.  In some parts, they add some water to the yogurt so that it almost has the texture of a cold soup.  I prefer it with a thick yogurt.   This time I used fresh peppermint and it was delicious. 

(Makes about 4-5 portions as a dip or meze)
500 g natural yogurt
a large cucumber, peeled and finely chopped into very small bits
2 cloves of garlic, peeled and crushed or finely chopped
a handful of fresh peppermint leaves (alternatively you can use dried and crushed peppermint)
salt to taste
a drizzle of olive oil (optional)

If you have time, prepare this few hours before you serve because it tastes much better if it waits a little while.
Mix yogurt with garlic, salt and cucumbers.  Finely chop most of the mint leaves and mix them into the yogurt.  Leave some of the mint leaves to garnish.  Pour the cacik into bowls to serve.  Garnish with some mint leaves. You can also add a drizzle of olive oil on top before you serve. 
You can also put some crushed chilies on top if you want to spice it up.  It goes really well with the Chickpea and Bulgur kofte from the previous post.

Monday, August 30, 2010

Chickpea and Bulgur Kofte

I guess this is another post that should be added to "What to do with leftover food" series.  I really didn't think it would turn out so good but as soon as I tried it I knew I had to write the recipe.  I like making bulgur pilaf because it's very easy and practical but I always make a little bit too much of it.  This time I made these nice falafel-like spicy koftes and they were super delicious.  If you have some canned chickpeas and bulgur, have a go at this and believe me you won't regret.  I normally prepare some chickpeas and freeze them in small bags to use them later on.  Bulgur rice in this recipe is very easy to make if you have some onions and fresh tomatoes, however you can also make it plain without onions and tomatoes if you'd like.  You would also need a food processor for this recipe.

(Makes about 10)

for Bulgur rice:
150 gr Bulgur (about 1 cup)
1 tomato, peeled and grated.
1 small onion - chopped
1/2 teaspoon of salt
1 teaspoon of blackpepper
2 cups of water or vegetable stock
1 tablespoon of olive oil

200 gr of cooked chickpeas
1 teaspoon of ground chilies
about 1 teaspoon of freshly milled blackpepper
salt to taste
1 tablespoon parsley
2-3 tablespoons of oil to cook

Start with making your Bulgur rice. First saute your onions with the olive oil.  Then add tomatoes and saute them with onions for about a minute. Add the bulgur, salt, pepper and water and leave it to cook over low heat for about 15 minutes.  Check regularly to make sure it's not sticking to the bottom of the pan.  When it's done leave it cool. 

To make the kofte, put the chickpeas, parsley, bulgur rice and the spices into the food processor.  Run it on a low level so that they are not forming a puree but a slightly crumbly mixture. 
When it's ready make little forms as in the picture and fry them on both sides on a non-stick pan with some olive oil or another oil of your choice.  Serve them with a nice green salad and Turkish cacik. (Recipe will follow)

Thursday, August 19, 2010

Bruschetta with Tomato and Basil


Here are a few things you can do by just getting up early.  By that I mean really early.  You can have a cup of tea in piece.  No kids running around.  You can also write in silence.  Not that I can write when the kids are around.  This really should be a habit for me.  So here is me writing about Bruschetta, which I really should when we have the opportunity to buy some fresh summer tomatoes and basil.  I've seen them made with a lot of different ingredients but for me the simple version is the best.  In some recipes they put onions in them too, which I don't prefer.  Garlic brings out the flavors of tomato and basil and goes really well with olive oil. In some recipes they skin the tomatoes and take the seeds out before making the bruschetta but I prefer the tomatoes unpeeled and with a lot of juice.  The juice moistens the bread with the garlic and olive oil very nicely.


(Makes about 6-8)
6-8 slices of baguette or Italian bread
3-4 tomatoes - diced
2 cloves of garlic - crushed
2-3 tablespoon of olive oil
1/2 tablespoon of balsamic vinegar
salt and freshly milled black pepper to taste
fresh basil leaves to garnish 

1. First chop the tomatoes and put them in a bowl.  Add in the crushed garlic, olive oil and balsamic vinegar.  You can also add some chopped basil leaves if you prefer. Put some salt and pepper to taste and move on to next step to prepare your bread.  If you prepare the topping with tomatoes a little earlier than serving time, the flavors will blend a little bit better.
2. Now to prepare the bread, you have few options.  Just chose whatever suits you.  
You can simply toast the bread in a toaster, you can toast them in the oven with some olive oil brushed over the slices or you can toast them on a non-stick pan with a little bit of olive oil brushed on both sides.  I've certainly tried all and they all result very good, however if you're in a hurry then I suggest toasting them on a pan.  This way you get them done quickly but be careful not to burn the bread. 
3. Last part is to put the tomato topping on the bread slices.  Garnish them with fresh basil leaves and serve them slightly warm.  This is really a nice taste of summer.

Monday, July 26, 2010

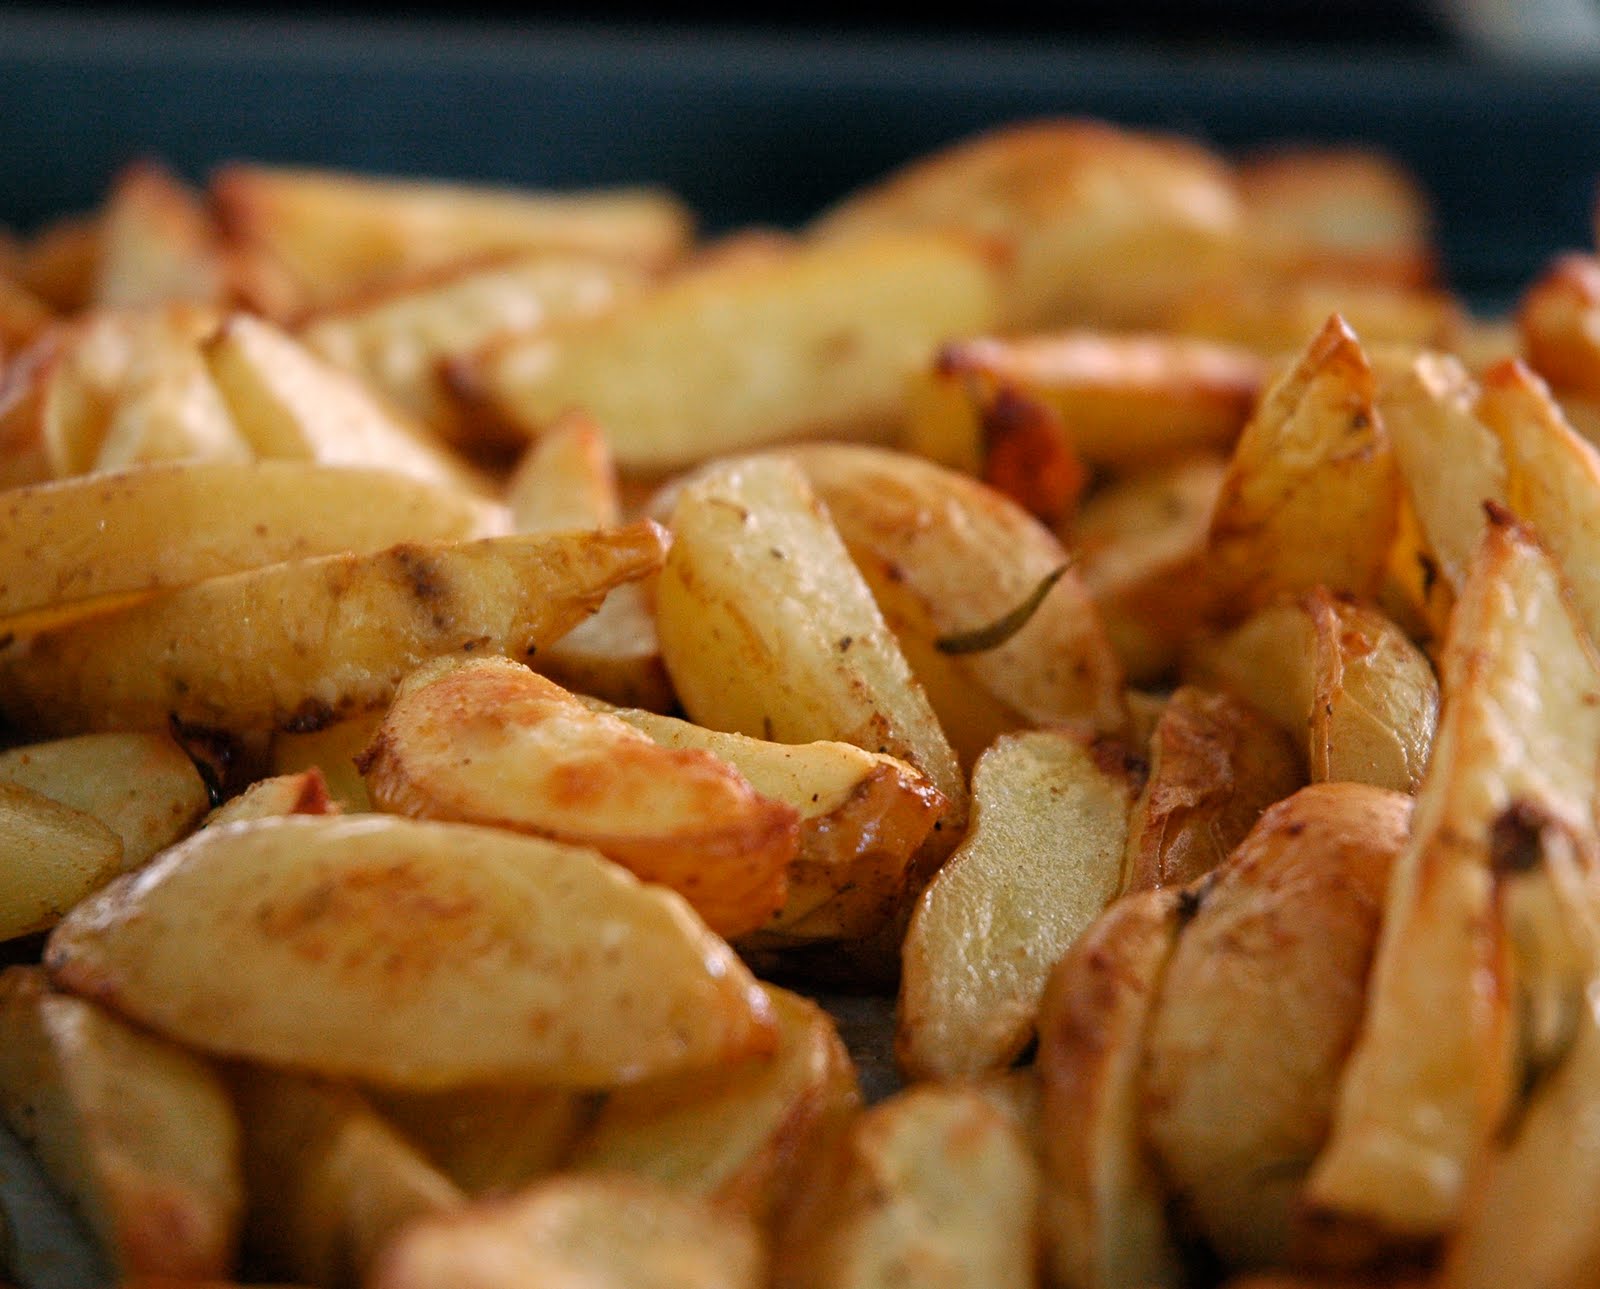
Oven Roasted Potatoes


It seems that summer is already over here and I'm ready to go into the Christmas mood.  After waiting for summer to arrive for so long, I'm finally giving up.  Yes, there has been some nice days that were warm (hot) and sunny, but here we are again with cloudy, gray skies and with temperatures that we should have had around spring.  Somehow, after having few days of summer, then next day with winter temperature seems to be really acceptable around here.  After living for very long time now, I am finally accepting the fact that I will never ever have an uninterrupted summer of 3 months (or more) again.  A week or two weeks of summer is perfectly fine.  It saves you a lot of energy.  No need to do spring cleaning.  Who would need to have clean windows for few days anyway, especially if it will rain right after you clean them?
But if you are having a day or two of summer, or if you are one of those lucky people who has long summer season, then I suggest you make these roasted potatoes as a side dish to your BBQ.  They are so easy to prepare. There is no precooking involved. They are healthier and tastier than usual fried potatoes.
I have learned how to make these from my mother-in-law.  I had few friends who have asked me the recipe before, so here it is.  I've made few changes to the original recipe, such as adding the vinegar, which makes the potatoes a little more crispy.


Oven Roasted Potatoes

(Makes 4 servings as a side dish)

About 1 kg potatoes
1/2 tablespoon of fresh thyme
2 tablespoons of fresh rosemary leaves
3-4 tablespoons of olive oil
1 tablespoon of white wine vinegar
Salt
Freshly milled black pepper

Preheat your oven to 200° C(400° F) before you start.  Wash the potatoes very well and without peeling them slice the potatoes into wedges.  Take a deep salad bowl and put the potatoes in and then the olive oil.  Turn them around to get the potatoes coated with olive oil.  Then add all the other ingredients and mix them well with the potatoes. On a flat baking tray, place a baking paper, then spread the potatoes on.  Put them in the preheated oven for about 30 minutes.  If you want them more crispy then roast them for about 20 minutes, then take them out,  quickly turn them around a little bit with the help of a spoon or spatula, then roast them for another 10.  Depending on the type of potatoes you are using, cooking time can vary between 30-45 minutes, so check if they are cooked before taking them out.  Do not burn your fingers while doing so.  Enjoy!

Monday, July 19, 2010

Hummus


It always feels good to be on holiday, but just like every holiday mine is over and I'm back home.  It was a great vacation at the south coast of Turkey with family and some very yummy homemade food.  I know that most people say their mother is the best cook, but my mother really is the best.  As my first post after the holiday, I decided to dedicate this post to my mother, and put few photos of some of the best meals she prepared for us.  I will not be putting all of the recipes here today, although I will at some point in the future, because I'm determined to try these recipes out in my own kitchen.  Here, I give you one of the best hummus recipes from my mother's kitchen.  It is very easy and quick to prepare if you have some cooked or canned chickpeas and some tahini.

Here are my holiday food photos:

Best cheesecake I have ever had, I'm really looking forward to try this one.


Tahini bread is general sold in every bakery, and it was the first time I had this at home.  It is very easy to make, you just need the usual bread dough and some tahini.


Here is the best leg of lamb I have ever tasted.  It's the boneless part of the meat rolled with rosemary and garlic, then slow cooked in the oven.


Lamb was served with a very soft and creamy potato gratin. 


I'm looking forward to try all these recipes out and share them here. So until then enjoy the hummus recipe below. 


2 cups of cooked chickpeas
1 clove of garlic
1/2 cup of tahini
3 tablespoons of olive oil
juice of 1/2 lemon
1 teaspoon of blackpepper
1 teaspoon of grounded cummin
1 teaspoon of salt
1 tablespoon of parsley leaves and some pickled cucumbers to garnish (optional)

In order to make the hummus, it is best to use a food processor.  Just put all the ingredients in (except the parsley and cucumbers) and blend for about 2-3 minutes until smooth.  You can garnish it with some parsley and pickles if you prefer.  Another option is to pour some melted butter with chili powder over it.  In any case, it tastes great and you can enjoy it warm or cold.  Serve with some pita bread. 

Thursday, June 10, 2010

Spinach Pizza with Crème Fraiche


While getting ready for vacation and having a million things to remember to pack, I didn't want to worry about food very much so we have been eating a lot of pizza, pasta, rice and salads.  It is a great opportunity to use the left over stuff in the fridge and in the pantry.  I enjoy trying to cook meals with what you have as it enforces creativity but the result can turn out to be a disaster sometimes or something "not so tasty".
This is a pizza I've learned from a very good friend, who lives very far away now.  I know she used to call this "Spanish pizza".  I'm not sure if it's the real name or only because she learned it from her Spanish friend.  I never forgot this pizza and I have been making it regularly.  It's so easy especially if you have a ready pizza dough or pastry.  I didn't have any so I made the dough this time.  This is a special pizza with no cheese and I recommend that you eat it cold or even the next day.  It tastes much better when it is colder, because you can feel the taste of the olives, olive oil, tomato and spinach more when cold.  The original version doesn't have any crème fraiche, but I have added it to make it a little bit softer and it made a great combination with spinach.  If you don't have any crème fraiche, then don't use it as it still tastes great without it.

(Makes about 2 round pizzas or one big square one - 2-3 portions)

Pizza dough:

1 1/2 cups of warm water
3 spoons of dry yeast
4 cups of flour (you can also use 2 cups of white flour and 2 cups of spelt or whole wheat flour)
1 1/2 teaspoon salt
1 tablespoon olive oil

Pizza topping:
2-3 tablespoons of crème fraiche
200-300 gram of fresh or frozen spinach
2-3 medium tomatoes diced
1 small onion chopped
1 clove of garlic crushed
A handful of olives with no seeds, chopped
2 tablespoons of olive oil
salt 
freshly milled black pepper

Preparing the dough:
You need to prepare the dough 2 hours in advance.  If you have a ready made dough then skip to the next part for topping. 
Mix all the ingredients of the dough in a pan and kneed very well for about 10 minutes.  Cover it with a clean tea towel and leave it to rise for about 1 1/5 - 2 hours.  Eventually the dough should be doubled in size.  When it is ready, flatten the dough with a rolling pin on a flat surface.  You may need to dust the dough with a little bit of flour for this, but you can also roll it out directly on a baking paper to save time.  

Topping:
First make the tomato sauce by sauteing the onions and garlic for few minutes in a pan with a table spoon of olive oil over medium heat.  Then add the tomatoes in and take it off the heat after few minutes.  The tomatoes shouldn't be too cooked.  Leave the tomato sauce to cool down for a while.
Next prepare the spinach by cooking them in a pan.  After they are cooked, make sure to drain the water from the spinach and leave it to cool.
When you have your pizza base ready and the ingredients are cooled down enough, start with spreading the crème fraiche over the pizza base with a spoon.  Then spread the spinach over and next, spread the tomato sauce over the spinach.  Last thing to put on top is the olives.  Sprinkle some salt and pepper over and put it in a preheated oven at 220° C(425° F) for about 15 minutes.  After you take it out of the oven, drizzle the 1 tablespoon of olive oil you have left over the pizza.
Eat it warm or cold but if you have some left overs, keep it in your fridge for the next day.  Believe me, you won't regret.

Tuesday, June 1, 2010

Fava Beans with Artichoke Hearts


You know those type of dishes that your mother makes but you don't really like, then you still have to eat it because you have to.  Fava beans (or broad beans) were one of those things I didn't enjoy as a child.  Lucky for me that the season for fava beans were very short.  I came to appreciate them long after I left home. Maybe, because there was nobody to cook them for me and they turned into something that reminds me home.  I also probably realized that they are actually very tasty.  This is a slightly modified recipe from my mother's one, because she actually fills the artichokes with the fava beans.  I bought some already prepared and cooked artichokes at the market.  Alternatively you can use tinned ones, but if you do then pick the ones without olive oil.  This dish is served cold and it's originally a meze, but can be served as a salad or starter as well. 

Fava Beans with Artichoke Hearts
 (Makes 4 portions as a starter)
900 g fava bean pods - shelled (beans makes about 300 g when shelled)
1 medium size onion - finely chopped
20 small artichoke hearts - prepared and cooked (or about 2 cans of artichoke hearts)
1 teaspoon salt
3-4 tablespoons of olive oil
a handful of fresh dill to garnish
If you have shelled your beans and ready to go, first you need to boil the beans in water for about 5 minutes.  This is apparently to get rid of the slightly bitter taste.  After boiling is finished, drain the water and set the beans aside.  Put about 1 tablespoon of olive oil on a non-stick pan and saute the onions for about 2-3 minutes over medium-high heat.  Next add the fava beans and a cup of water.  Cover the pan with a lid and let the beans cook over medium heat for about 15-20 minutes until they are tender but not too soft.  Keep checking regularly if there is still a bit water in the pan to prevent the beans sticking to the bottom. If necessary add in some hot water, but not too much as you don't want it to look like a soup in the end.  Next, add in the artichoke hearts and let it simmer over low heat for about 5 minutes. When it's done, set it aside and let it cool.  When it is cold enough, add in the rest of the olive oil, as this will bring out the flavors of the beans and artichokes.  Garnish with dill leaves before serving. 
It's vacation time for me soon, therefore, the posts will be a little less for a while, but I'll keep you all posted with my culinary adventures from Turkey (and mainly my mom's food).

Wednesday, May 12, 2010

Vegetable Samosa with Puff Pastry

Celeriac is really something I don't know how else to cook, other than the usual Turkish dishes I learned from my mother and as soup.  I really wanted to do something a little different this time and I thought to try it as a samosa, which is an Indian dish, very similar to the typical Turkish borek but has a spicy curry touch.  It's one of my favorite starters when I go to an Indian restaurant.  I absolutely love them.  I didn't want to make these too hot for the usual reason.  I wanted the kids to enjoy this little snack.  I generally make a dish with celeriac adding in potatoes, peas, carrots, onions and of course olive oil.  These little samosas have all of those except the carrots.  I preferred to use the puff pastry to give it a lighter taste.  They turned out really good.  In fact, I am going to make this one of my repetitive recipes and try it with other vegetables as well.  


(Makes 16)
1 rectangular puff pastry (42x26 cm) (16"x10")
1 small celeriac - chopped into little cubes
2 medium potatoes - chopped into little cubes
1 small onion - chopped
1 cup of frozen or fresh peas
1 teaspoon of curry powder
1/2 teaspoon of mild chili powder
1/2 teaspoon of cumin ground
1/2 tablespoon of fresh dill leaves
1 tablespoon of olive oil
1 egg- beaten
salt and pepper to taste


First of all, you need to saute the vegetables in a non-stick pan.  Heat the pan with the olive oil and put the onions first.  Saute them until they are cooked and then add in the celeriac, potatoes and the peas.  Add in the spices, with some salt and pepper.  Make sure the vegetables are cooked but they shouldn't be over-cooked, otherwise they will get mushy.  When they are done take them off the heat, add in the dill and set it aside to cool.  Preheat your oven to 180° C(356° F) degrees.  Lay the puff pastry on a baking tray over a baking sheet.  I used the big puff pastry and sliced it into 16 little squares as in the photo, but if you can find the little square shaped puff pastries then don't bother to buy the big one for this recipe.  Once you are ready, put about a spoonful of the vegetables on the pastry and fold it into a triangle shape.  Spread some egg onto the edges with a brush, so that the ends of the pastry can stick together.  I used a fork to press the ends together and folded the corners to give it a more samosa looking shape.  When it is all ready brush them over with the rest of the egg and put them in the oven for about 20 minutes until they are done.  These are best when they are eaten warm.  If you want to make a meal out of them, I recommend to serve them with a nice green salad. 

Friday, May 7, 2010

Vanilla and Cinnamon Waffles

I remember where I ate my first waffle ever.  It was in Istanbul, in Bebek.  I am not sure if the place still exists but they used to make the world's best chocolate and banana waffles.  At least for me it was the best.  My cousin introduced me to that place at the time and I'm so happy that she did, because I have never forgotten those delicious waffles and their lovely smell.  That was long long time ago, and I have eaten many waffles since, but I guess none of them were that good.  Few months ago I was in search for a toaster, which can also make waffles and I found what I was looking for.  I have made waffles only twice since I bought it.  This recipe came out in the second trial and they were very good, so I wanted to share.  If you have a waffle maker then try this recipe. The waffles turn out so good, you can even eat them without putting anything on them.  This recipe made about 10 waffles for me.


2 cups of flour
2 cups of milk
2 tablespoons of sugar
1/2 tablespoon of vanilla sugar
2 teaspoons of baking powder
1/2 teaspoon of cinnamon (use cinnamon that is freshly grounded, it still has to have some lovely cinnamon smell)
1/2 teaspoon of lemon zest
3/4 teaspoon of salt
2 tablespoon of butter (melted)
2 eggs

Start with whisking the eggs and the sugar in a bowl.  Add the milk, melted butter, lemon zest and vanilla sugar to this mixture.  In a separate bowl, mix the rest of the ingredients, flour, baking powder, cinnamon and salt.  Once the dry ingredients are mixed well enough, combine the two mixtures and whisk all together.  Use a ladle to put the mixture into your preheated waffle maker.  Try not to put too much, otherwise it will overflow.  Bake them until they have a nice golden brown color.  I put some maple syrup and banana slices on mine and sprinkled a little bit of icing sugar.  Next time I will be trying them with chocolate and bananas. 

Tuesday, May 4, 2010

Macaroni and Cheese with Spinach


I seem to always have a question in my mind when I'm thinking about what to cook. "Would my children eat this?" They are not picky children, but they are still very small.  I do try to introduce them to a variety of cuisines as much as possible, but it is not always easy to find suitable dishes, especially when one of them has only 10 teeth.  I try to make sure I cook something that is attractive for everybody.  I do the usual pasta dishes once a week or so, but I do get bored of cooking pasta the usual way sometimes and I need a change.  This time I decided to try the famous mac and cheese, but I wanted to add some vegetables in it to make a little bit more balanced meal for the children.  This is quite an easy recipe and kids love it.  You can always try with other kind of vegetables or cheese.  


300 g pasta (cornetti type)
about 300 g of cooked spinach (you can use fresh or frozen)
100 g Gorgonzola cheese - chopped into little pieces
50 g Mozzarella - chopped into little pieces
70 g grated Parmesan
250 ml milk (about a cup of milk)
2 eggs
salt and pepper
15 gr butter - chopped into little pieces
4-5 fresh basil leaves - roughly chopped


Start with cooking your pasta as usual by following the instructions on the package.  When it's cooked drain and leave it to cool for a while.  In a separate bowl, whisk two eggs, milk, some salt and pepper.  Take a gratin or baking dish and put your pasta, spinach, Gorgonzola, most of the Parmesan (leave about a tablespoon of it for later), basil and egg mixture in and mix them all together.  Next, put the Mozzarella pieces and sprinkle the rest of the Parmesan over, then put the bits of butter on top.  Bake it in a preheated oven at 180° C(356° F) for about 35-40 minutes.  I would check with a fork if it's done inside as well before taking it out.  It goes really well with a mixed salad.  Enjoy!

Tuesday, April 27, 2010

Swiss Sunday Bread from Spelt flour - Zopf

Sometimes I'm not really sure if there is more varieties of cheese in Switzerland or more varieties of bread.  Just like it is with all different kinds of cheese, every Swiss canton has its own traditional bread.  Zopf is a very traditional one and it's quite unique.  Zopf means braid as in the shape of this bread.  It has a very special buttery taste and it's mainly preferred for Swiss Sunday breakfasts.  I prefer this bread sometimes to the other breads, because it lasts longer and with all the butter, it stays softer.  I bought a bread machine about 5 years ago.  Yes, I have just said I live in the bread country, but sometimes it's nice to make fresh loaf at home.  It was the best kitchen appliance I have ever bought and it was certainly the most used kitchen appliance I have.  Especially in the last couple of years, as I've been finding it difficult sometimes to get out of the house with my two little children, I used my bread machine a lot more than I used to.  I've also started trying different shapes of breads, because we all know a loaf can be boring sometimes.  Then I use the machine only to prepare the dough.  For this bread I have also made the dough in the bread machine.  If you don't have one then basically follow the instructions for normal dough.   I used spelt flour for this version, which is not the traditional zopf bread, but it tastes great.  I made the same bread again couple of days later to use the left over flour, but sprinkled some sesame seeds over it to give it a slightly different taste.  I also took out the egg that is normally used in the traditional dough, because I believe this way the bread is softer and lasts a bit longer.  I only used one egg to brush the bread over with.


500 g spelt flour
270 ml milk - at room temperature (If you don't want to use milk, you can also use water to replace.)
50 g butter - at room temperature
15 mg of dry yeast
1/2 teaspoon sugar
1 teaspoon salt

1 egg - beaten - to brush the dough
1 tablespoon sesame seeds (optional)


If you are using a machine, put the first 6 ingredients and start making the dough.  If you're kneading it by hand, make sure that your ingredients are not too cold.  Ideally they should be at room temperature, otherwise you'll have to wait longer for your dough to rise.  For hand kneading, mix all your ingredients well and knead a dough until it's all smooth.  Leave your dough covered with a clean kitchen towel in a warm place for about 1 to 1,5 hour until it's doubled in size. 
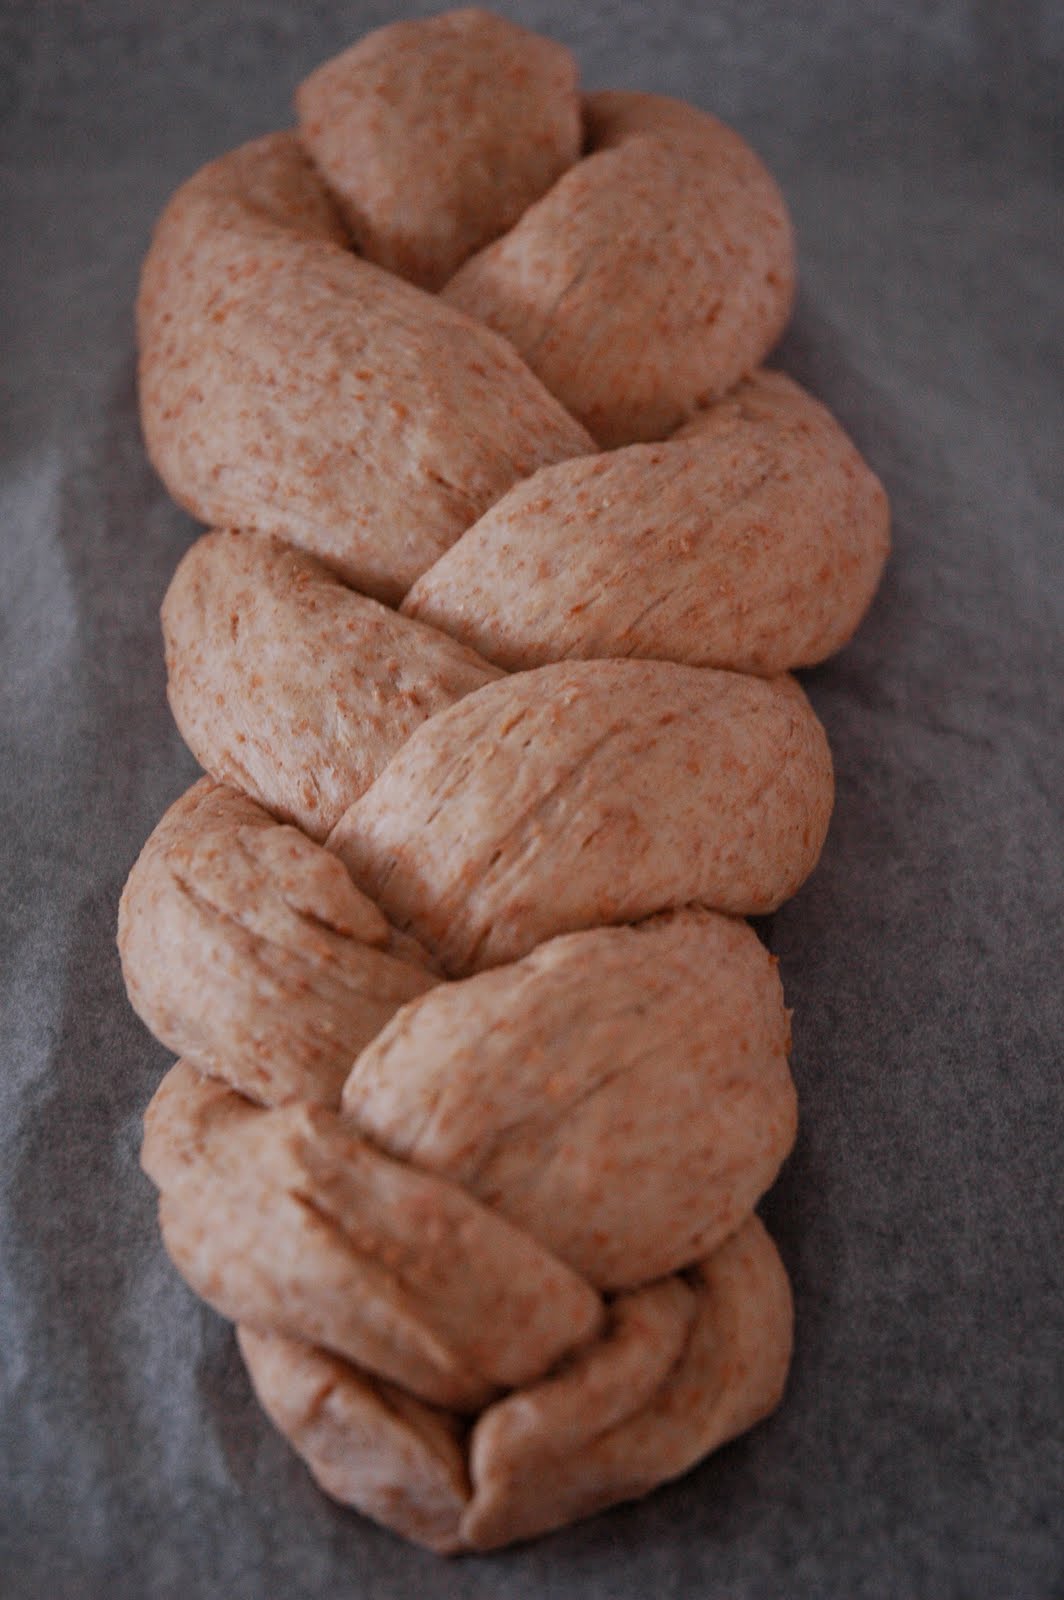
When it's ready, preheat your oven to 180° C(356° F) degrees and get ready to braid your bread.  Divide the dough into two pieces, where one piece is double size of the other one.  Then form one long and one short rolls from the dough.  Put the longer one on a baking sheet shaped like a "U" and put the short roll in the middle of that "U". (See picture)  This will give you three rolls where you can form your braid.  Your braid should look like the second picture in the end.  Once ready, brush it over with the beaten egg and sprinkle sesame seeds if you'd like.  Bake it in your preheated oven for about 35-40 minutes.  When it is done, leave it to cool at least for about 15-20 minutes before any attempt to slice it with a knife.  Spread some butter on your lovely freshly baked Zopf slice and enjoy your breakfast!

Wednesday, April 21, 2010

Potato salad


You may think "Why on earth she's putting a potato salad recipe?".  Mainly because this is by far the best potato salad on earth.  It's my mother's recipe and although I have tried other potato salads, this still remains my favorite by far.  It has plain and natural flavors, not so many ingredients.  No cream, no butter, no mayonnaise, no vegetable stock.  It has the best flavor combination.  I've tried the vegetable stock version of the potato salad, which I think is a typical way of adding flavor to the potatoes around here, however I much prefer the natural potato taste in this version.  This goes perfect with grilled meat dishes in the summer and you can keep in the fridge for 2-3 days without a problem.  I made a lot of it this time, because I absolutely love the left over of this salad.  I think that it tastes even more delicious the next day.  If you have time, prepare the salad couple of hours in advance so that potatoes can absorb the dressing a little bit more.
I have slightly modified the salad dressing this time by adding some mustard.  I would like to hear from you if you try this salad.


700 g potatoes
2 spring onions - chopped
a handful of fresh parsley - finely chopped

Salad dressing
3 tablespoons of olive oil
2 tablespoons of canola oil
1 teaspoon of mustard
1 tablespoon of apple vinegar
1 tablespoon of white wine vinegar
1 teaspoon of salt
some freshly milled black pepper

Cook your potatoes by boiling them in water without peeling them.  Be careful not to overcook them.  After they are done let them cool.  When they are cool enough, peel and dice them.  After you chop your onions with their green bits, add them onto the potatoes.  Prepare your dressing by mixing all your ingredients in the above list.  Pour the dressing into the salad and stir it all very slowly.  Try not to mash the potatoes while you are doing this.  At last add the chopped parsley to the salad.  Leave the salad to rest for about an hour before you serve.  

Friday, April 16, 2010

Green Lentil Salad


I grew up eating a lot of lentils and I probably ate every type of lentil dish there is.  Later on when I got to know the Indian dal I loved it.  It was a little bit different than the dal type of dish my grandmother used to make, but it was just a little bit more spicy.  My favorite lentil dish is the red lentil soup that my mother makes, however, I will put that recipe here some other time.  The green lentil salad is something I have tried in a restaurant and I have made it probably only once before this time.  Lentils are very nutritious and very healthy legumes and I always want to cook more lentil dishes for my family but I always end up making the soup.  I had some sun dried tomatoes in my kitchen, which inspired me to make this salad.  It's a very light salad but it's filling.  Perfect for spring and summer meals. 
I will for sure put more lentil recipes here in the future because I just bought loads of lentils again.


200-300 g green lentils
1 spring onion - chopped
1/2 leek - chopped
7-8 pieces of sun dried tomatoes - soaked in warm water for about 10 minutes (alternatively you can use sun dried tomatoes that are soaked in olive oil)
1 tablespoon of chives - chopped

For the dressing:
1 cup yogurt
2 tablespoons of olive oil
1 tablespoon of mayonnaise
1/2 tablespoon of lemon juice
salt and pepper to taste
chili powder - optional

Start with putting your lentils in a pan, cover them with water and bring to boil.  After they start boiling, reduce the heat and simmer the lentils for about 20-25 minutes.  If you overcook them, they will get mushy so check regularly.  After lentils are done, drain them and leave them to cool.  While you are waiting, chop the soaked sun dried tomatoes into small bits.  Start making your salad dressing by mixing all your ingredients listed above and set it aside.  When lentils are cool enough, mix them with the other ingredients and finally add your salad dressing.  You can garnish with some more chives.   The salad tastes even better if you leave it few hours in a cool place, so feel free to prepare it a little bit in advance.

Friday, April 9, 2010

Aubergine Rice


Aubergine is my favorite vegetable on earth.  It's very tasty and you can make a lot of different dishes with it.  In the Turkish cuisine and in the Mediterranean kitchen, the aubergine has a very distinctive place.  It can easily be combined with any other vegetable, with cheese or meat.  I buy a couple of them every week.  They are kind of like olives to me.  I have to have them in my fridge just in case I run out of everything else.  Aubergines are always there to rescue me.  It was one of days where I didn't know what to cook.  Then I remembered my purple friends in the fridge.  I generally try to cook some rice or pasta or anything with grains to complete the meal for the kids.  Because mine love rice and pasta and pizza, just like all the other children.  This rice was a good idea to cook, especially because it combined vegetables and rice in the same dish and it was a success.
This actually is a typical Turkish rice (pilav), which I have learned from my mother.  When I was looking around for alternative recipes, I have seen that in most of them tomatoes were added to the rice.  I haven't used tomatoes here as I believe they will shadow the taste of aubergines here.


(Serves 6 as a side dish)

2 Aubergines ( peeled partially in stripes and chopped)
4 tablespoons of olive oil
1 medium onion chopped
about 250 g (1.5 cups) rice ( I used long grain white rice here)
about 600 ml (3 cups) water

about 1 teaspoon salt
2 tablespoons of chopped parsley to garnish


Start with stir-frying your aubergines with the olive oil in a non-stick deep pan over medium-high heat.  Don't worry if aubergines absorb all of the oil in the pan.  They will release the oil after they are cooked.  When they are done, take them out to a plate.  Put your onions in the same pan and using the oil that is left in the pan saute your onions.  After the onions are cooked, put your rice in and add the water and salt.  Put the lid on and cook it for about 20 minutes.  Check regularly in between if there is still some water left in the pan.  Right before almost all of the water is absorbed, turn off the heat, add the aubergines on top of the rice, cover the pan and leave the rice to rest for about 10-15 minutes. When it's ready, garnish it with chopped parsley leaves and serve.

Wednesday, April 7, 2010

Tomato and Red Onion Salad


I had this in London many many years ago.  It was the first time I was visiting the city during my first travel to Europe and it was the first time I've been outside my home country.  Too many first times of everything, I have been on the road for about 10 days and have eaten in various hotels and restaurants in Europe.  I have never eaten outside my own country before so I wasn't very used to all European food.  By the time I was in London, I have already started craving for something fresh, something Mediterranean, something that had olives or tomatoes or feta cheese or fresh onions in it.  We found a restaurant that looked very good and I saw a tomato salad in the menu.  I instantly thought it was "the tomato salad", the Turkish kind.  In the end how many kinds of tomato salads could there be? How wrong was I?  There was a plate of sliced tomatoes, then couple of red onion rings that were randomly placed on top.  I was slightly disappointed, because there were no cucumbers, no peppers, nothing else in it.  Then they brought some balsamic vinegar and olive oil.  That made that salad divine, which made it worth in the end.  I never forgot this salad and made different versions since.  When I saw some fresh basil in the market last week, I thought of making the classic mozzarella salad with fresh tomatoes and basil, but then I remembered this salad.  It goes really well with a spring or summer BBQ and takes about 5 minutes to make.  You only have to have very nice and tasty tomatoes to make it with.  This one here is enough to serve 2.

Tomato and Red Onion Salad

2-3 fresh tomatoes - sliced
1 medium red onion - sliced
a handful of fresh basil leaves
1 tablespoon of balsamic vinegar
3 tablespoons of olive oil
salt to taste

Prepare your salad sauce first, by mixing the olive oil and balsamic in a small bowl.  Add some salt and taste.  You can add some chopped basil leaves to the sauce if you'd like.  Put your tomatoes and onions in a salad bowl then mix it with the salad sauce.  Leave the salad like that for about 5 minutes before you serve.  Put your portions in flat salad plates and garnish with the fresh basil leaves. 

Monday, April 5, 2010

Baked Vegetables with Cheese


As soon as the weather gets a little bit warmer, I start to crave vegetable dishes.  Especially if we are grilling in the weekends, I like to have some vegetables with whatever we are grilling.  This is something that got inspired by Sarah Wiener's cookbook Frau am Herd, which I bought recently.  It's only available in German for now, but it's a great book if you just want to cook natural and simple food.  The saute part of the cooking was a very good tip from my mother.  This is a very easy and quick way of making vegetables, but most importantly, it's very light.  You can replace any of the vegetables in the recipe with others or use another kind of cheese that you already have in your fridge.  Try this once and believe me you won't regret it.  It's so good that I made it again today, but this time I added potatoes and leeks to below combination, but excluded the onions.  It was equally yummy.  This recipe here, serves about 4 as a side dish.


2 carrots - peeled and chopped
3 zucchinis - chopped
1 yellow pepper - chopped
1 red onion - chopped
about half a cup grated Parmesan cheese
1 tablespoon of olive oil
salt and pepper

Start with heating your oven to 200° C.  Then start sauteing all your vegetables at the same time in a pan with a tablespoon of olive oil.  Add some salt and pepper while you are doing so.  This shouldn't take more than 8-10 minutes.  When your vegetables are still looking fresh and not completely done, put them in a gratin baking dish or in a roasting tray and sprinkle your grated cheese over them.   Stick it in the oven on a top shelf for about 15 minutes.  That's all.  Enjoy your light and tasty vegetables.

Tuesday, March 30, 2010

Fried Cauliflower


Beginning of the week starts with an empty fridge in our household.  I'm never sure why, because we are buying food at least once a week and yet the fridge is almost empty on every Monday.  I had to figure out what to make for lunch as usual and all I had in the fridge was a cauliflower and some carrots.  Normally carrots are the default option that I go for, but instead I decided to take on the cauliflower.  I didn't want to just steam or boil it, then end up making a cauliflower salad like I do most of the time.  I wanted to try another Turkish recipe, the fried version.  I haven't had this dish for a very long time, so I got some tips from my mother and I also looked through my cookbooks.  Tess Mallos has a version of this in The Complete Middle East Cookbook, but I made my mother's version.  In the end, that would always the best version for me.  This is very good as a starter, appetizer or as a vegetarian dish, especially when it's combined with garlic yogurt.  I made some steaks with tomato sauce and saffron noodles for the main dish.   In the end it was a delicious meal.


About 500 g cauliflower, broken to its pieces and washed
2 tablespoon of flour
4 tablespoon dry breadcrumbs
2 eggs
oil for frying
salt

Garlic Yogurt

Plain yogurt
a clove of garlic


To start with fill up a deep pan with water and bring it to boil.  Add some water in it then put in your cauliflower that's already broken to its pieces. Boil it for about 10 minutes until it's tender but not soft.  Don't overcook it.  If it's too soft, it would be hard to boil them.   When they are done, put them in a colander and drain the water.  Leave them to cool for about 10-15 minutes.

In a plate or bowl, beat your eggs and mix them with the flour.  Add some salt and pepper to the egg-flour mixture.  In another plate put your breadcrumbs.  Put some oil in a frying pan and heat it up.  You can use a non-stick pan to fry but in the end you are going to need a generous amount of oil to properly fry the cauliflowers so don't be stingy with the oil.  When your pan is ready and hot enough,
dip your cauliflowers first into the egg-flour mixture.  Once they are covered with it, dip them into the breadcrumbs, then put them in the pan.  Fry them until they are golden and a little bit crispy.  

For the garlic yogurt, crush the garlic and mix it into the yogurt.  Dip your fried cauliflowers into the garlic yogurt and enjoy the taste. 

Friday, March 19, 2010

Easy Hollandaise Sauce with Steamed Asparagus


When you go to the supermarkets to buy your groceries at this time of the year, the first thing you will see are probably the strawberries.  A week or so after strawberries, the asparagus starts showing up. They put them in the displays with those fancy vegetable peeling gadgets and with ready made hollandaise sauces out of the box or out of a pack, full fat, low fat, all different versions you can imagine.
I remember, the first time I tried to cook asparagus I had no idea about how to get started. Forget cooking it, I didn't even have a clue about how to peel the funny looking things. I haven't seen them in my life before I came to this country.  It wasn't something we used to eat at home.  It was my husband who encouraged me to give them a go.  As a new wife who wanted to learn more about how to cook in Switzerland, I wanted to try and see if could pull it off. The result was a total disappointment. The asparagus was not peeled right and wasn't cooked enough. The whole thing was terrible, however there was one achievement; the hollandaise sauce I made from scratch.  Even then I wasn't so into these ready made sauces so I found a recipe on the internet and made it myself.  I remember that it was so yummy and I could just eat it without anything.
This time however, I felt like I had a bit more experience in cooking asparagus so I was quite confident when I saw the first bunch in our local supermarket this week. I decided to make the sauce at home.  I started looking on the internet for a very good recipe, but I wasn't able to find one that looked easy and practical. Some looked really complicated even though they said that it's a really easy sauce. In the end I came up with below recipe for this sauce.  It tasted very good and it wasn't complicated at all. The trick was to whisk it constantly and to use low heat.
For the asparagus, I used my pressure cooker to steam them, but they ended up a little too soft. Therefore below is my recommended timing for a medium size pressure cooker.

Makes about 3-4 servings as a starter.

1 kg green asparagus
2 tablespoons of white wine vinegar
3 tablespoons of water
3 egg yolks (slightly beaten)
100 grams of butter
juice of half a lemon
some salt and pepper
a little bit of hot chili powder or cayenne pepper

Start with peeling the asparagus and don't forget to cut the rough end bits. Put them in your pressure cooker and steam them with a bit water for about 5 minutes. Cooking time can vary according to the type of pressure cooker you have. Alternatively you can use a steamer, but then you need to check the instructions to cook the asparagus for the model you have.
For the sauce, start by putting the vinegar and water in a small sauce pan and bring it to simmer. Do not boil it. Keep the heat at low temperature and start whisking the eggs in very slowly. After the eggs are in, keep whisking it for about a minute.  Slowly add the butter to the mixture bit by bit and continue to whisk. Once you have all the butter in, add some salt and pepper, then the chili powder. Give it a good stir and that is all.
Serve it on warm asparagus as displayed in the photo and enjoy.